


Learning how to tie a tie is an essential skill that every gentleman should master. Whether you're preparing for a job interview, wedding, or formal business meeting, knowing the right technique can make all the difference in your appearance and confidence. At SAYKI, we understand that a well-tied tie is the finishing touch that elevates your entire look from ordinary to extraordinary.
Quick Links
Why Learn to Tie a Tie?
Mastering the art of tying a tie opens doors to countless opportunities and situations where proper attire is essential. A perfectly knotted tie demonstrates attention to detail, professionalism, and respect for the occasion. Different knots serve different purposes – some are ideal for business meetings with their clean, symmetrical appearance, while others work better for formal events or casual gatherings.
Understanding various tie knots allows you to adapt your style to different collar types, dress shirt styles, and occasions. A narrow knot might complement a slim-fit shirt perfectly, while a broader knot could be the ideal choice for a classic spread collar. The right knot can also help balance your overall proportions and facial features.
Understanding Your Tie
Before diving into specific knotting techniques, it's crucial to understand the anatomy of your tie. Every tie consists of two main parts: the wide end (also called the blade) and the narrow end (the tail). The wide end is typically the part that shows prominently when the tie is properly tied, while the narrow end remains hidden behind it.
The quality and construction of your tie significantly impact how well it knots and maintains its shape throughout the day. A well-constructed tie will have proper interfacing that helps it hold its form and creates clean, crisp knots. The length of your tie is equally important – when properly tied, the tip of the wide end should ideally reach your belt buckle, with the narrow end being shorter.
Choosing the Right Tie
Selecting the appropriate tie involves considering several factors: fabric, pattern, color, and width. Silk ties are the most versatile and professional choice, offering excellent drape and knot retention. Cotton and wool ties can work well for more casual settings, while linen ties are perfect for summer occasions.
The pattern and color of your tie should complement your dress shirt and men's suit or tuxedo. Solid colors offer maximum versatility, while patterns like stripes, dots, or paisleys can add visual interest when paired thoughtfully. Remember that thick ties often work better with smaller knots, while thinner ties benefit from larger, more substantial knots that provide proper visual weight.
See also : Wedding Attire Choosing Guide for Men
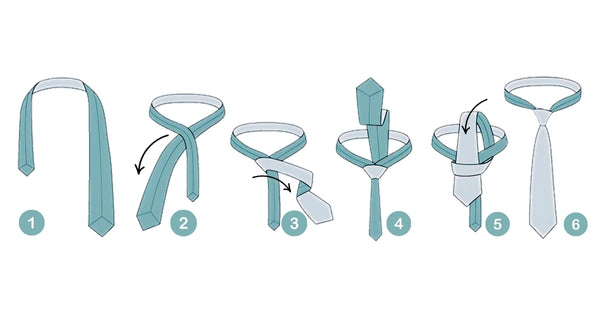
Mastering the Four-in-Hand Knot
The Four-in-Hand knot is arguably the most popular and versatile tie knot, perfect for both beginners and experienced tie-wearers. This asymmetrical knot works well with most collar types and creates a timeless, slightly casual appearance.
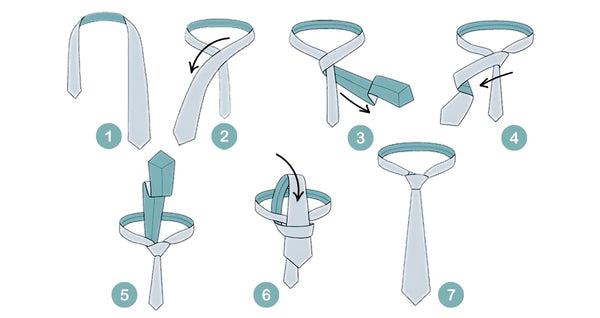
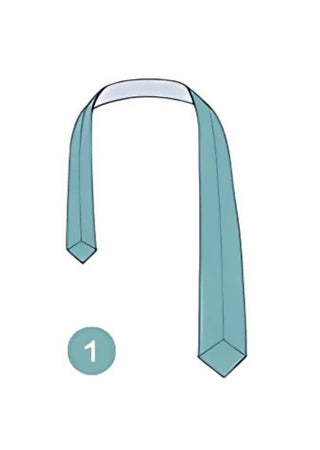
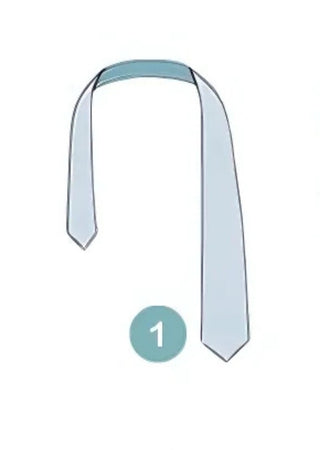
Step 1: Position the Tie
Place the tie around your neck with the collar up. The wide end should hang significantly lower than the narrow end about 12 inches longer.
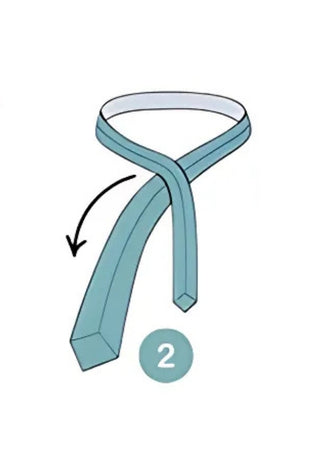
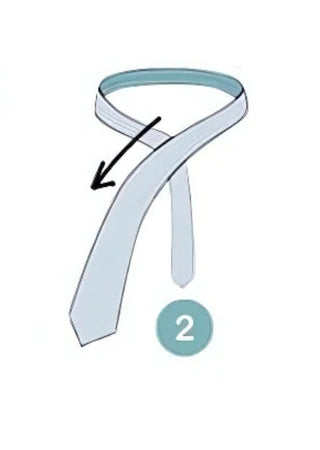
Step 2: Cross the Wide End
Bring the wide end across the front of the narrow end to form an X shape near your chest.
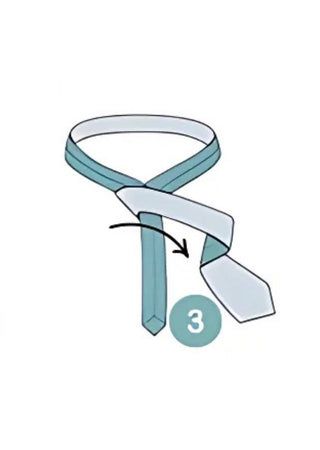
Step 3: Wrap Around Back
Loop the wide end around the back of the narrow end and bring it back to the front.
Step 4: Cross in Front
Pass the wide end across the front again, creating a horizontal band just below your collar.
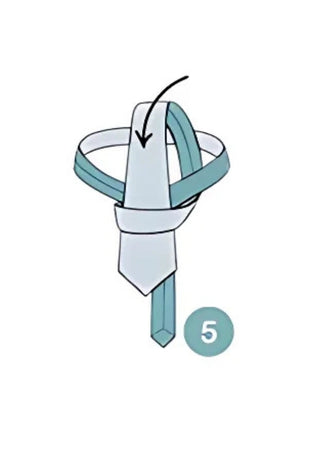
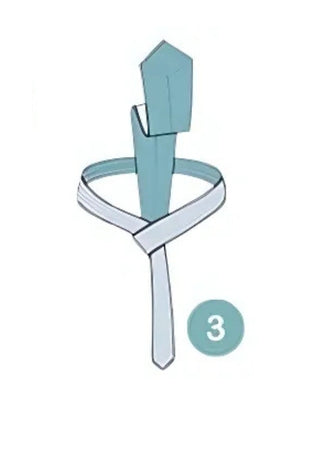
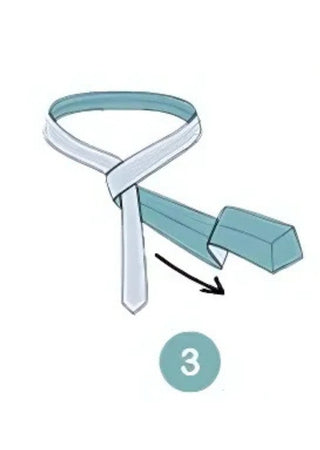
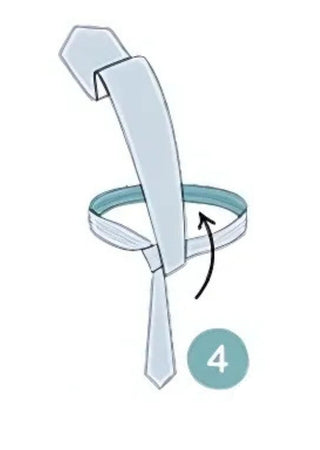
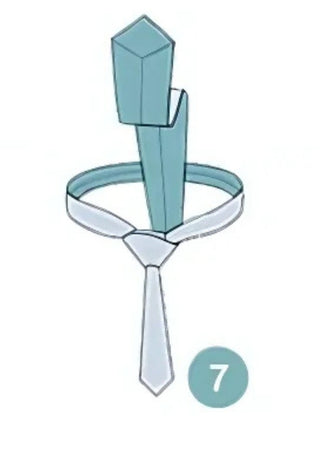
Step 5: Thread Up Through Neck Loop
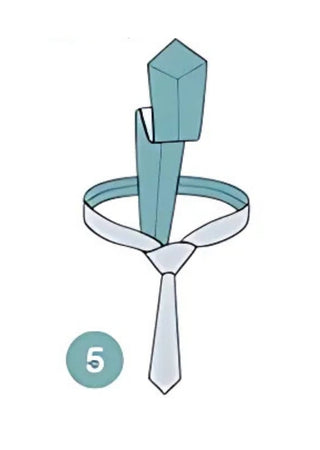
Bring the wide end up through the space between your collar and the tie from underneath.
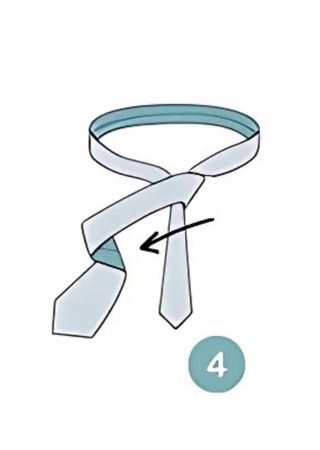
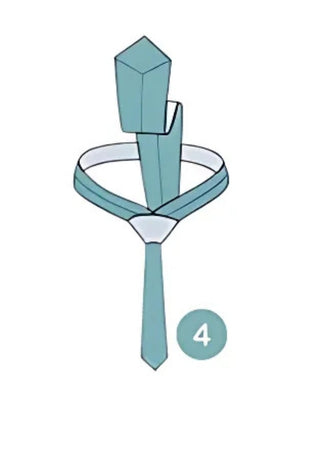
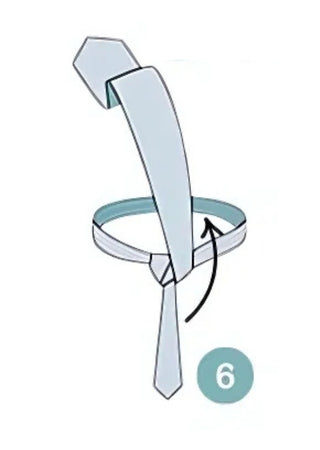
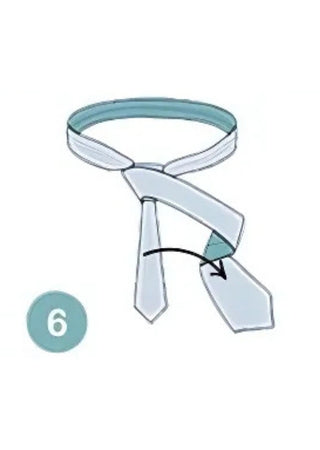
Step 6: Thread Down Through Front Loop
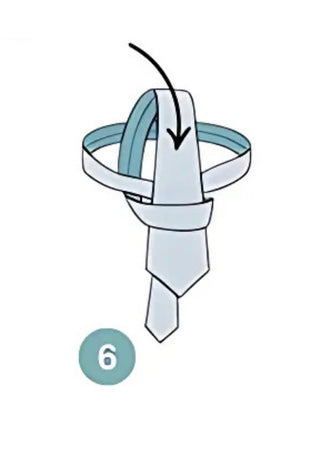
Thread the wide end down through the horizontal loop you created in Step 4, pulling it through completely.
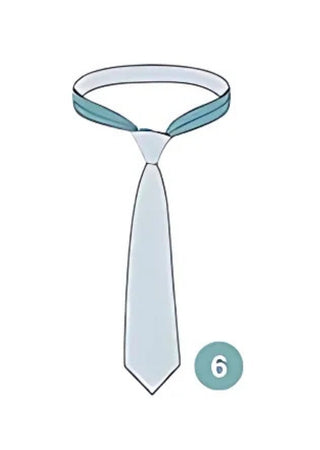
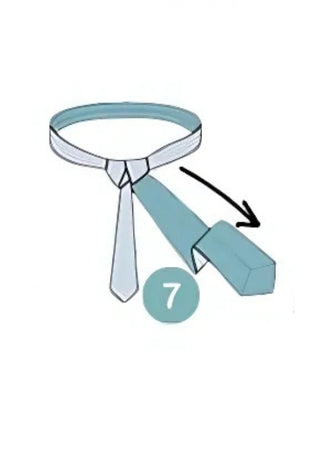
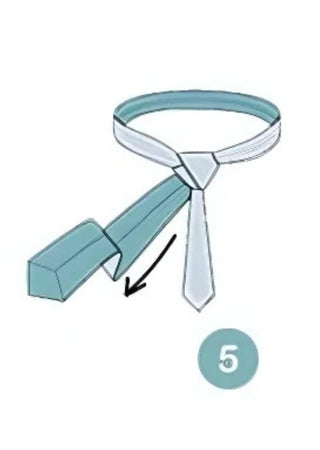
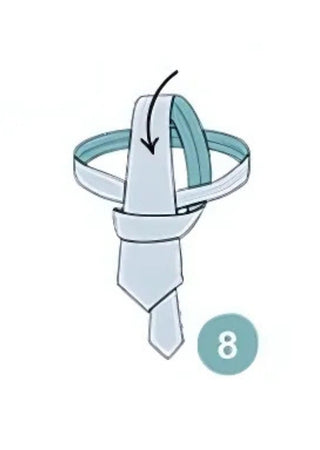
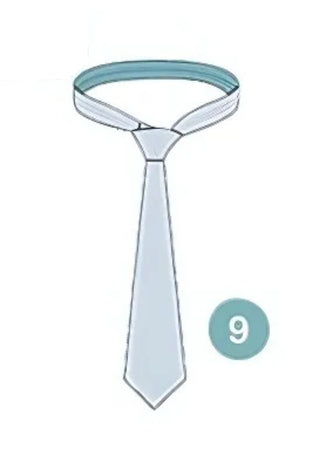
Step 7: Tighten and Adjust
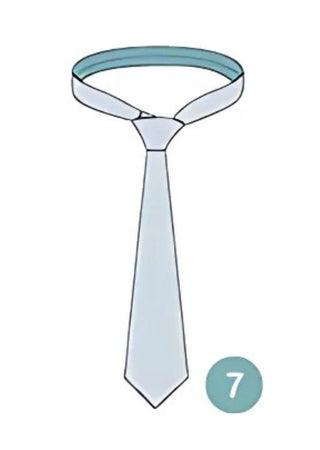
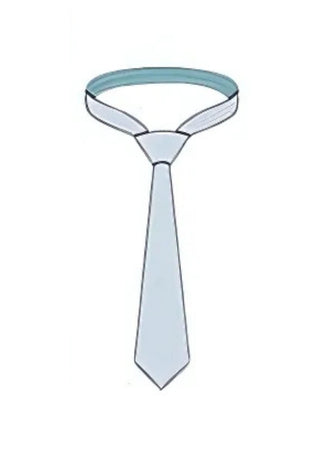
Hold the narrow end steady and pull the wide end to tighten the knot, then slide it up to your collar. Adjust the position so the wide end reaches your belt buckle.
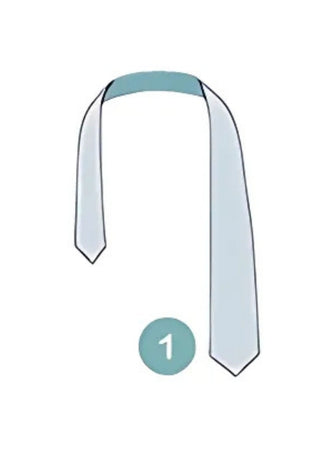
The Simple Knot: A Quick and Easy Option
The Simple knot, also known as the Oriental knot, is the smallest and most straightforward tie knot. It's perfect when you need a quick, no-fuss solution or when working with particularly thick ties that would create bulky knots with more complex techniques.
Step 1: Position the Tie
Place the tie around your neck so that the wider end hangs lower than the narrow end about a foot longer.
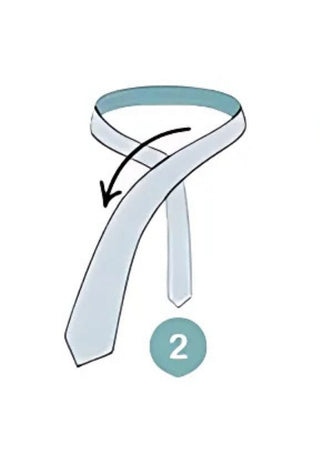
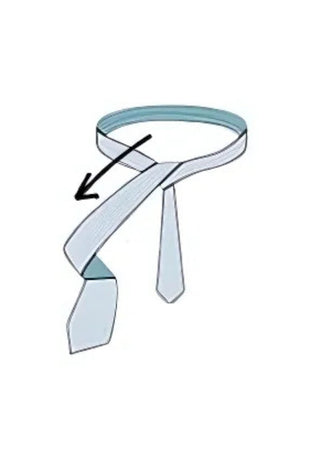
Step 2: Cross the Wide End Under
Cross the wide end under the narrow end, creating an X-shape just below your collar with the wide end coming from underneath.
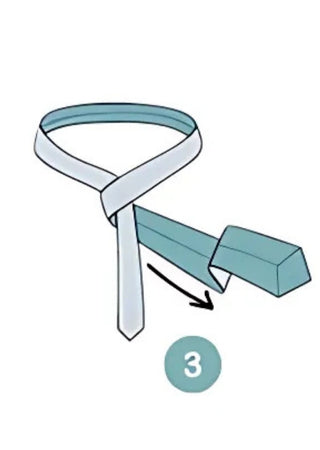
Step 3: Wrap Behind and Around
Continue by wrapping the wide end around the front of the narrow end, making a horizontal band across the front.
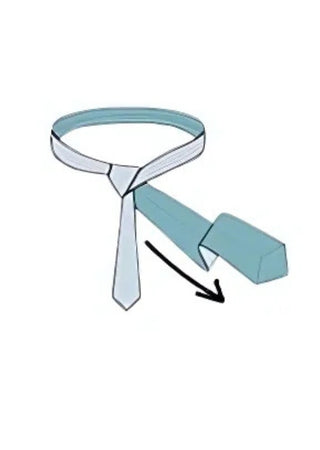
Step 4: Thread Up Through Neck Loop
Pull the wide end up through the neck loop from underneath, bringing it upward toward your chin.
Step 5: Thread Down Through Front Loop
Thread the wide end down through the horizontal loop you created in Step 3, pulling it completely through.
Step 6: Tighten and Adjust
Hold the narrow end steady and pull the wide end to tighten the knot, then slide it up to your collar for the final position.
The Full Windsor Knot: For a Formal Look
The Full Windsor knot creates a large, symmetrical, triangular knot that exudes confidence and formality. This knot works exceptionally well with spread collars and is perfect for important business meetings, formal events, and occasions where you want to make a strong impression.

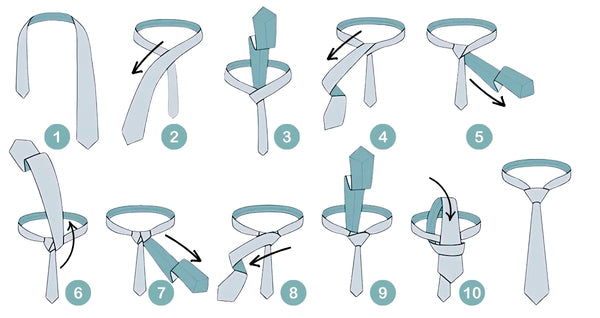
Step 1: Position for Length
Drape the tie around your neck with the wide end hanging much lower, about 18 inches longer than the narrow end. This knot uses more fabric.
Step 2: Cross Over
Cross the wide end over the narrow end, positioning the intersection near your chest.
Step 3: First Up Through Neck Loop
Bring the wide end up through the neck loop from underneath, pulling it upward toward your chin.
Step 4: Pull Down to Right
Bring the wide end back down, letting it fall on the same side it started.
Step 5: Cross Behind
Move the wide end behind the narrow end and pull it across to the opposite side, forming a horizontal wrap.
Step 6: Second Up Through Neck Loop
Bring the wide end up again and pass it through the neck loop from the side you just moved it to.
Step 7: Pull Down to Left
Let the wide end fall straight down on the opposite side, balancing the knot.
Step 8: Cross in Front
Pull the wide end across the front of the knot, forming a smooth horizontal band.
Step 9: Third Up Through Neck Loop
Bring the wide end up through the neck loop one final time from underneath.
Step 10: Thread Down Through Front Loop
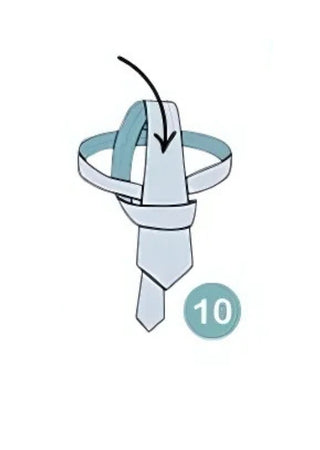
Thread the wide end down through the horizontal loop you created in Step 8, pulling it completely through.
Step 11: Tighten and Shape
Pull the wide end through completely, then tighten by pulling on both ends. Shape the knot by gently squeezing its sides to create the perfect triangular form.
The Half Windsor Knot
The Half Windsor strikes the perfect balance between the simplicity of the Four-in-Hand and the formality of the Full Windsor. This medium-sized, symmetrical knot works well with most collar types and is suitable for both business and social occasions.
Step 1: Initial Positioning
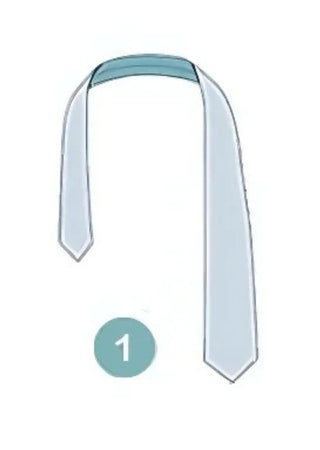
Drape the tie around your neck, making the wide end hang significantly lower (around chest level) while the narrow end rests near your sternum.
Step 2: Cross Over

Cross the wide end over the narrow end, creating an intersection point just below your collar.
Step 3: Wrap Behind
Wrap the wide end behind the narrow section and bring it back to the front.
Step 4: First Up Through Neck Loop
Bring the wide end upward, passing it through the opening at your neck, and let it fall forward.
Step 5: Pull Down to Right
Let the wide end fall down naturally on the same side it just exited, aligning it with the narrow end.
Step 6: Cross in Front
Move the wide end horizontally across the front to create a clean layer over the knot-in-progress.
Step 7: Second Up Through Neck Loop
Bring the wide end up through the neck loop from underneath one more time, pulling it upward.
Step 8: Thread Down Through Front Loop
Thread the wide end down through the horizontal loop you created in Step 6, pulling it completely through.
Step 9: Tighten and Adjust
Pull the wide end through completely and tighten the knot by pulling on both ends, then slide it up to your collar for the final position.
Tips and Tricks for Perfect Tie Knots
Achieving consistently perfect tie knots requires practice and attention to detail. Always ensure your collar is properly positioned before beginning – it should be up and the collar points should lie flat. The key to any great knot is maintaining proper tension throughout the tying process, neither too loose nor too tight.
When tightening your knot, create a dimple just below it by pinching the sides of the tie gently as you slide the knot up. This small detail adds sophistication and shows that you understand proper tie etiquette. If your knot appears crooked, don't try to adjust it by pulling on one side – instead, loosen it completely and start over.
The length of your finished tie is crucial for a polished appearance. The wide end should ideally touch your belt buckle, while the narrow end should be completely hidden behind the wide end. If you find your tie consistently ends up too short or too long, adjust your starting position accordingly.
Choosing the Right Tie for the Occasion
Different occasions call for different approaches to tie selection and knotting. For business meetings and professional settings, opt for conservative colors like navy, burgundy, or subtle patterns paired with classic knots like the Four-in-Hand or Half Windsor. These combinations project competence and reliability.
Formal events such as weddings, galas, or black-tie occasions demand more sophisticated approaches. A Full Windsor knot with a high-quality silk tie in coordinating colors creates an appropriately elegant appearance. When wearing a tuxedo, consider a bow tie instead of a traditional necktie for the most formal occasions.
Social gatherings and casual business events offer more flexibility in both tie selection and knot choice. This is where you can experiment with bolder patterns, textures, or even more unique knots while still maintaining a polished appearance.
Tie Care and Maintenance
Proper care extends the life of your ties and ensures they always look their best. Always untie your tie completely at the end of the day rather than pulling it over your head, as this can damage the fabric and stretch the tie out of shape. Hang your ties properly or roll them loosely to prevent wrinkles and creasing.
Most ties should be dry cleaned only, as water can damage the silk fibers and cause shrinkage or color bleeding. If you notice minor wrinkles, hang your tie in the bathroom while taking a hot shower – the steam can help release minor creases naturally.
Store your ties properly by either hanging them on a tie rack or rolling them in a drawer with tissue paper. Avoid folding ties, as this can create permanent creases. Rotate your tie collection regularly to prevent excessive wear on your favorites.
Quality ties from SAYKI are designed to maintain their shape and appearance with proper care, ensuring that your investment in quality menswear pays dividends in both style and longevity. Remember that a well-maintained tie is an essential component of any gentleman's wardrobe, capable of transforming a simple dress shirt and men's suit combination into a truly distinguished look.